There is a specific rhythm to a room when the work is flowing. The sound of a premium mechanical keyboard should mimic heavy raindrops hitting a thick pane of glass, a muted, rhythmic thud that settles the mind and keeps you focused. You press the spacebar, expecting that satisfying acoustic feedback, but instead, you hear a frantic, hollow clatter. It shatters the illusion of quality instantly, leaving you typing on something that sounds suspiciously like a broken thrift-store typewriter.
That frustrating noise stems from a simple manufacturing oversight that plagues almost every mass-produced board on the market. Factory switches lack proper acoustic damping out of the box, leaving the internal components to vibrate violently against each other. The harsh metal wire rattling beneath your larger keys creates a high-frequency ping that travels right up your fingers, disrupting your concentration and ruining the physical pleasure of typing.
You might think the solution is to spend another two hundred dollars on boutique switches, custom foam inserts, or a heavier machined aluminum case. The mechanical keyboard hobby is notorious for convincing people they need to buy their way out of a problem. But the secret to that coveted, deep sound profile isn’t found in an endless cycle of online shopping. It requires a brief, highly intentional intervention with the hardware sitting right in front of you.
Taking just a fraction of your afternoon to address these friction points completely rewrites the acoustic signature of your desk. By applying a thick coat of dielectric grease directly to the stabilizer wires, you can eliminate that cheap rattle permanently. The transformation is immediate, bringing a sense of weight, purpose, and professional quiet to every single keystroke.
The Perspective Shift: From Assembly to Acoustic Tuning
Most mechanical keyboard enthusiasts begin by treating their boards like a collection of expensive plastic building blocks. You snap the colorful pieces together, assuming the premium price tag guarantees a flawless experience straight from the factory. But a keyboard is less like a static toy and more like a physical extension of your nervous system. It has moving parts, tension, and resonance that require proper management.
When you shift your mindset from merely assembling parts to actually tuning a wooden acoustic instrument, the flaws become opportunities. The metal stabilizer wire—the long bar that keeps your spacebar from tilting when you hit it off-center—is just a raw mechanism. Without a dampening agent, bare metal strikes the hard plastic housing with every press. Your goal is to introduce a soft buffer, silencing the collision so the true, deep sound of the switch can resonate without interference.
Consider Marcus, a thirty-four-year-old audio engineer based in Seattle. After dropping three hundred dollars on a highly praised mechanical board for his home studio, he noticed his sensitive microphones picking up a microscopic, high-pitched ping every time he hit the Enter key while editing tracks. Instead of returning the board or accepting the flaw, he treated the keyboard’s internal stabilizers exactly like the heavy brass hinges on a vocal booth door. He applied a tiny dab of silicone-based grease to the wire ends. That simple ten-minute routine killed the noise instantly, turning a mass-produced peripheral into a truly custom soundscape.
For the Heavy-Handed Typist
If you tend to bottom out your keys with aggressive force, your stabilizers endure massive daily impact stress over the course of a single workday. The resulting rattle is loud, sharp, and highly distracting, especially if you share an open office or work near a sleeping child. Heavy typing demands heavy acoustic protection.
You need a generous, thick application of damping grease focused squarely on the sharp ninety-degree corners of the wire. This acts like a dense memory foam pillow for the metal, absorbing the shock of a heavy keystroke. The grease traps the kinetic energy, returning a deep, satisfying thud that feels incredibly planted and secure beneath your fingers.
For the Nimble Coder
If your typing style is light and rapid, floating gracefully over the keys rather than driving straight through them, a different approach is necessary. Packing the stabilizer housing with too much grease will make the larger keys feel sluggish, like typing in deep wet sand. You want the acoustic benefits without sacrificing the rapid return of the spring.
Focus solely on the microscopic points of metal friction where the wire physically clips into the plastic housing. A pinpoint, needle-drop application ensures the key snaps back to its starting position instantly. This surgical precision silences the high-frequency tick that accompanies rapid, glancing strikes while keeping the board feeling incredibly fast.
The Mindful Application
This routine does not require you to dismantle your entire keyboard, void your warranty, or desolder a hundred tiny switches. It is a highly localized ten-minute physical fix focused entirely on the stabilizers—the true culprits behind the vast majority of acoustic rattle.
Approach this as a methodical quiet ritual before your workday begins or on a lazy Sunday morning. Clear off your desk mat, set up a bright overhead light, and gather just a few specific items to finally tame the noise. Working with intention is far better than rushing through the process.
- A wire keycap puller to safely remove your spacebar, shift, and enter keys without scratching the plastic surface.
- A curved plastic syringe filled with standard dielectric grease to reach deep into tight, recessed spaces.
- A pair of fine-tipped metal tweezers to gently lift the internal stabilizer stem if it gets stuck.
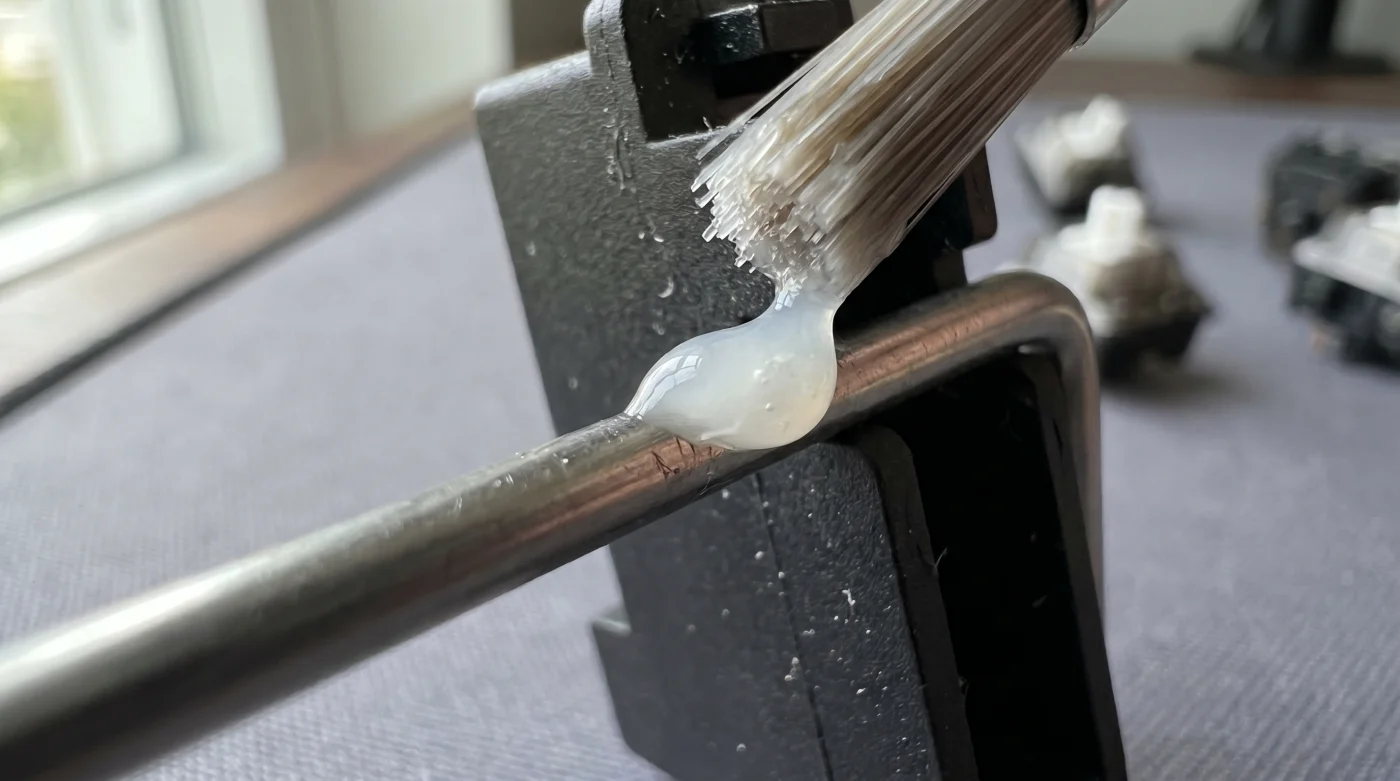
First, pull the keycap straight up to expose the colored switch and the two outer stabilizer stems. Insert the narrow plastic grease syringe tip right into the gap where the metal wire enters the plastic housing. Squeeze a tiny bead of grease, roughly the size of a grain of rice, directly into that opening.
Use your tweezers to press the stabilizer stems up and down a dozen times. You will feel the friction physically melt away as the grease naturally coats the internal wire and spreads evenly across the plastic walls. Once the motion feels entirely smooth, replace the keycap and strike it firmly; the rattle will be gone, replaced by a dense, muted thock.
The Bigger Picture
We spend thousands of hours interacting with our keyboards, yet we rarely consider the physical and mental toll of a harsh, rattling digital interface. The constant, subconscious irritation of using a poorly tuned tool drains your focus in subtle ways, chipping away at your concentration until the noise finally stops.
Taking ten minutes to apply dielectric grease to your stabilizers does far more than fix a piece of office equipment. It transforms a chaotic, noisy typing experience into a predictable, grounding rhythm. When your everyday tools respond with quiet, deliberate feedback, the work itself feels less like a frustrating chore and more like a refined craft.
‘A keyboard shouldn’t fight your fingers; it should quietly agree with them. The difference between a toy and a tool is ten minutes of tuning.’
| Key Point | Detail | Added Value for the Reader |
|---|---|---|
| Factory Stabilizers | Bare metal wire hitting hard plastic housing without any buffer. | Identifies the exact root cause of your typing fatigue and acoustic distraction. |
| Dielectric Grease | Thick, non-conductive lubricant applied directly to friction points. | Eliminates high-pitched rattle permanently, offering a premium sound for pennies. |
| Ten-Minute Prep | Targeted application using a syringe without desoldering switches. | Saves hours of tedious labor while achieving a custom, professional soundscape. |
Frequently Asked Questions
Can I use standard oil instead of dielectric grease?
No. Thin oils will pool at the bottom of the keyboard housing and fail to cushion the wire. You need a thick, highly viscous grease to absorb the physical impact.
Will this routine void my keyboard’s warranty?
Not at all. You are simply removing the keycaps and applying a topical lubricant to the external housing of the stabilizers, which requires zero disassembly of the electronic components.
How often do I need to reapply the grease?
A proper application of high-quality dielectric grease will easily last two to three years of heavy daily typing before requiring any touch-ups.
Do I need to lubricate the smaller alphabetical keys too?
No. The smaller keys use the internal switch spring, which rarely rattles. The grease is only necessary for the large keys—like the spacebar, shift, and enter—that rely on a metal stabilizer wire.
What if my keys feel sticky after applying the grease?
You applied slightly too much. Simply use a dry microfiber swab or a twisted paper towel to dab the excess grease out of the housing until the key returns quickly.